Tutorial outline

Photogrammetry — from capture to 3D mesh

A complete workflow to transform a set of photos into a clean and usable 3D model.

Photogrammetry: a complete COLMAP · OpenCV · Open3D pipeline

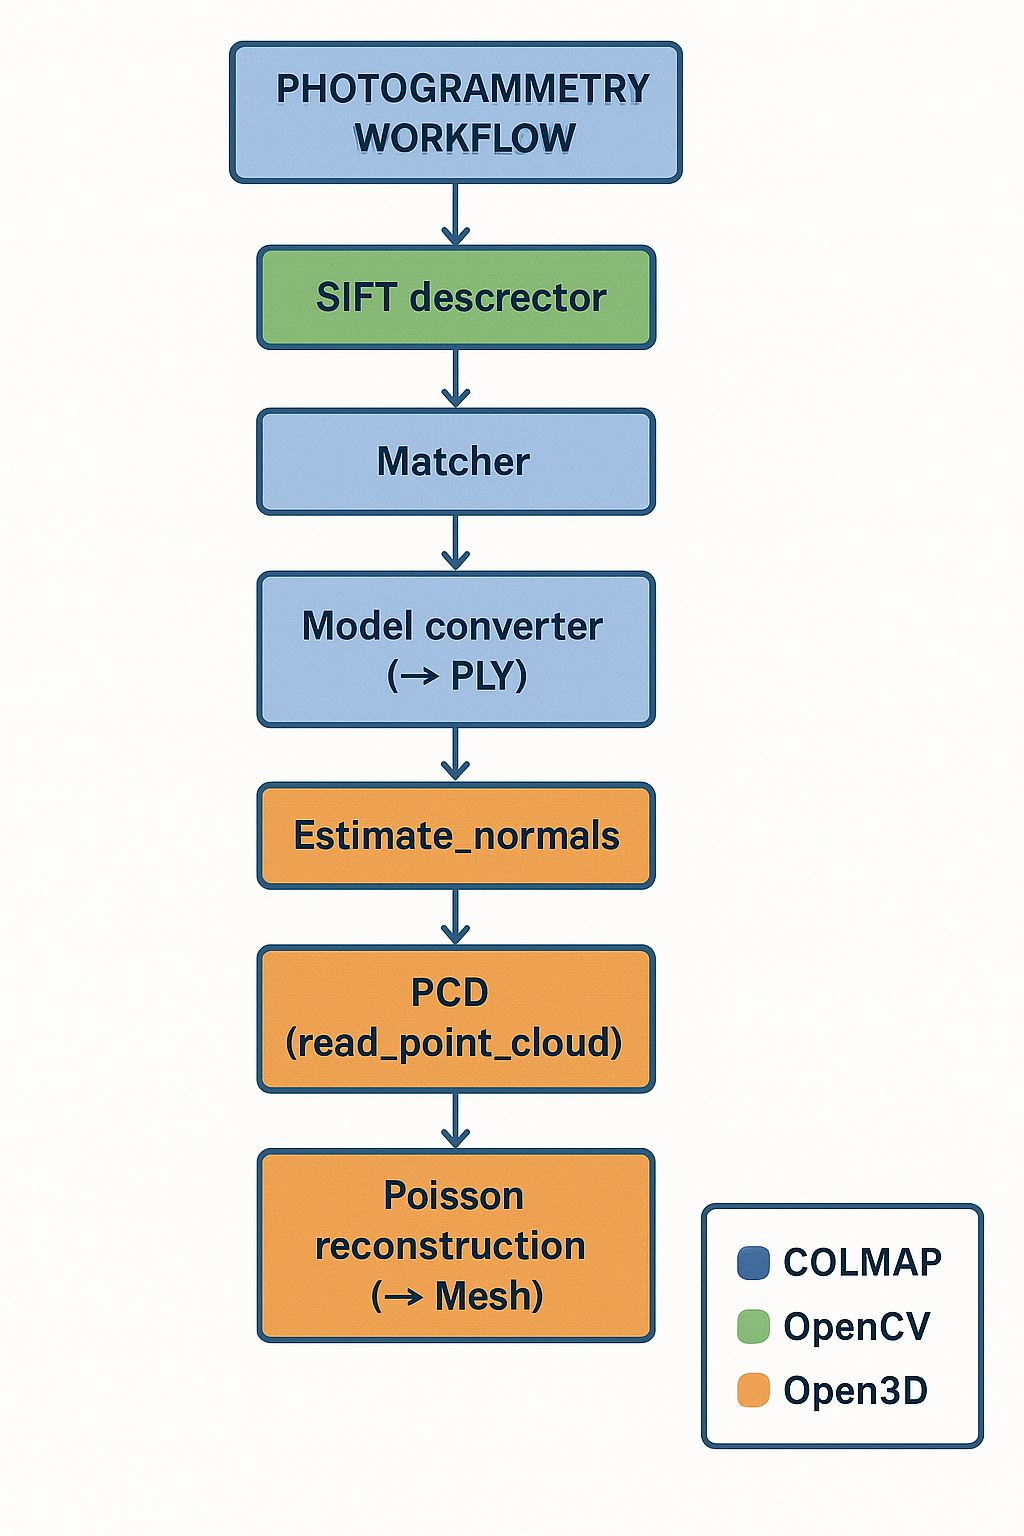
This page presents a modern photogrammetry workflow, from SIFT feature extraction to Poisson surface reconstruction. Each block in the diagram is explained with its role, data formats and a code example.

Structure-from-Motion SIFT & matching Point cloud & mesh
Photogrammetry workflow diagram
Overview

Main pipeline steps

Starting from a set of photos, we obtain a texture-ready mesh for 3D printing, rendering or game-engine use.

  1. SIFT descriptor extraction (OpenCV).
  2. Image matching and SfM reconstruction (COLMAP).
  3. Export of the SfM model as a PLY point cloud.
  4. Loading into Open3D and normal estimation.
  5. Poisson surface reconstruction and mesh export.
COLMAP OpenCV Open3D
Block details

Module-by-module explanation

Each card below corresponds to a block in the diagram, with its role, input/output formats and an example command or code snippet.

Step 1
OpenCV
SIFT descriptor
Keypoint detection and robust descriptors.

For each image, scale- and rotation-invariant interest points are extracted. The result is a list of keypoints and a descriptor array that will be used for matching between views.

Input: images (JPG/PNG) Output: keypoints + descriptors
# Minimal Python example
import cv2

img = cv2.imread("image_01.jpg", cv2.IMREAD_GRAYSCALE)
sift = cv2.SIFT_create()
keypoints, descriptors = sift.detectAndCompute(img, None)
print(len(keypoints), "detected points")
Step 2
OpenCV
Matcher
Matches descriptors between image pairs.

Each descriptor from one image is matched to its nearest neighbor in another image. Lowe’s ratio test removes ambiguous matches before exporting or sending the data to COLMAP.

Input: SIFT descriptors Output: lists of 2D ↔ 2D matches
# Brute Force Matcher + ratio test
bf = cv2.BFMatcher()
matches = bf.knnMatch(desc1, desc2, k=2)

good = []
for m, n in matches:
    if m.distance < 0.75 * n.distance:
        good.append(m)
Steps 3–4
COLMAP
SfM & Model converter → PLY
Reconstructs camera poses and a sparse point cloud.

COLMAP uses the matches to estimate camera poses (Structure-from-Motion), compute a 3D point cloud, and export this model in a standard format such as PLY so it can be processed by Open3D.

Input: images + matches Output: SfM model + PLY
# Example conversion from COLMAP model to PLY
colmap model_converter \
   --input_path path/to/model \
   --output_path path/to/export \
   --output_type PLY
Step 5
Open3D
PCD (read_point_cloud)
Loading the point cloud into Open3D.

The PLY file exported by COLMAP is loaded and becomes a PointCloud object. This is the starting point for cleanup, normalization and surface reconstruction operations.

Input: PLY / PCD Object: open3d.geometry.PointCloud
import open3d as o3d

pcd = o3d.io.read_point_cloud("scene.ply")
print(pcd)
o3d.visualization.draw_geometries([pcd])
Step 6
Open3D
Estimate_normals
Computes one normal per point using a local neighborhood.

Open3D estimates the local surface orientation by analyzing neighboring points (k-nearest neighbors or radius search). Normals are then consistently oriented with respect to the scene center or camera.

Input: raw point cloud Output: point cloud + oriented normals
# Normal estimation
pcd.estimate_normals(
    search_param=o3d.geometry.KDTreeSearchParamHybrid(
        radius=0.05, max_nn=30
    )
)
pcd.orient_normals_consistent_tangent_plane(k=30)
Step 7
Open3D
Poisson reconstruction → Mesh
Generates a closed mesh from the point cloud + normals.

The Poisson algorithm reconstructs an implicit surface that best fits the normal field. The mesh is usually cleaned (crop, simplification, removal of small components) before export.

Input: point cloud + normals Output: triangular mesh
# Poisson reconstruction + save
mesh, densities = o3d.geometry.TriangleMesh.create_from_point_cloud_poisson(
    pcd, depth=9
)

mesh = mesh.remove_unreferenced_vertices()
o3d.io.write_triangle_mesh("scene_mesh.ply", mesh)
Going further

Resources and best practices

A few guidelines to improve the quality of your reconstructions.

Photo quality

Use a regular shooting interval, good angular coverage, and avoid completely smooth or reflective surfaces. The more texture there is, the more reliable the matches will be.

Point cloud cleanup

Before reconstruction, experiment with isolated point removal filters, downsampling and region-of-interest subsets to obtain a cleaner mesh.

Texturing & export

The generated mesh can be sent to Blender, Meshroom or other tools for texturing, normal-map baking, or export to a game engine.

Notebook Colab

From photos to STL mesh: complete code

This section summarizes the essential blocks of the notebook Photos ➜ 3D Mesh (STL) with COLMAP in Google Colab: installation, COLMAP pipeline and mesh conversion with Open3D.

📥 Download notebook (capture.ipynb)
Block A
COLMAP · OpenMVS
Installation & project structure
Run only once at the beginning of the Colab notebook.
%%bash
# Install COLMAP dependencies
sudo apt-get update
sudo apt-get install -y libmetis-dev git cmake build-essential \
    libboost-program-options-dev libboost-filesystem-dev libboost-graph-dev \
    libboost-system-dev libboost-test-dev \
    libeigen3-dev libsuitesparse-dev libfreeimage-dev libgoogle-glog-dev \
    libgflags-dev libglew-dev qtbase5-dev libqt5opengl5-dev \
    libcgal-dev libatlas-base-dev libopenimageio-dev openimageio-tools \
    libopenexr-dev libceres-dev

# Optional additional Python libraries
pip install trimesh shapely open3d
import os

PROJECT_DIR = "/content/colmap_project2"
IMAGES_DIR = os.path.join(PROJECT_DIR, "images")
DB_PATH     = os.path.join(PROJECT_DIR, "colmap_db.db")
SPARSE_DIR  = os.path.join(PROJECT_DIR, "sparse")
DENSE_DIR   = os.path.join(PROJECT_DIR, "dense")
MESH_DIR    = os.path.join(PROJECT_DIR, "mesh")

os.makedirs(IMAGES_DIR, exist_ok=True)
os.makedirs(SPARSE_DIR, exist_ok=True)
os.makedirs(DENSE_DIR, exist_ok=True)
os.makedirs(MESH_DIR, exist_ok=True)

print("Project:", PROJECT_DIR)
Block B
COLMAP
COLMAP pipeline (SfM + dense)
Photo upload, extraction, matching, reconstruction.
from google.colab import files
import shutil, subprocess

def run(cmd):
    print("▶", " ".join(cmd))
    subprocess.run(cmd, check=True)

# 1) Upload images into IMAGES_DIR
print("Upload your photos (20–100 images recommended)...")
uploaded = files.upload()
for name, data in uploaded.items():
    dest = os.path.join(IMAGES_DIR, name)
    with open(dest, "wb") as f:
        f.write(data)
    print("Saved:", dest)

# 2) Feature extraction
run([
    "colmap", "feature_extractor",
    "--database_path", DB_PATH,
    "--image_path", IMAGES_DIR,
    "--SiftExtraction.use_gpu", "0",
])

# 3) Exhaustive matcher
run([
    "colmap", "exhaustive_matcher",
    "--database_path", DB_PATH,
    "--SiftMatching.use_gpu", "0",
])

# 4) Reconstruction (mapper)
run([
    "colmap", "mapper",
    "--database_path", DB_PATH,
    "--image_path", IMAGES_DIR,
    "--output_path", SPARSE_DIR,
])

# 5) Undistortion for dense reconstruction
SPARSE_MODEL = os.path.join(SPARSE_DIR, "0")
run([
    "colmap", "image_undistorter",
    "--image_path", IMAGES_DIR,
    "--input_path", SPARSE_MODEL,
    "--output_path", DENSE_DIR,
])
Block C
Open3D
Point cloud & mesh (Open3D)
PLY export from COLMAP and Poisson reconstruction.
%%bash
set -e
PROJECT="/content/colmap_project2"
UNDIST="$PROJECT/dense"

echo "==== Export PLY point cloud ===="
colmap model_converter \
  --input_path "$UNDIST/sparse" \
  --output_path "$PROJECT/sparse_cloud.ply" \
  --output_type PLY

ls -lh "$PROJECT/sparse_cloud.ply"
import open3d as o3d

project_root = "/content/colmap_project2"
ply_path     = f"{project_root}/sparse_cloud.ply"

print("Loading point cloud...")
pcd = o3d.io.read_point_cloud(ply_path)
print(pcd)

# Normal estimation
pcd.estimate_normals(
    search_param=o3d.geometry.KDTreeSearchParamHybrid(
        radius=0.05, max_nn=30
    )
)

# Reconstruction Poisson
mesh, densities = o3d.geometry.TriangleMesh.create_from_point_cloud_poisson(
    pcd, depth=9
)

mesh = mesh.remove_unreferenced_vertices()
out_mesh = f"{project_root}/scene_mesh.ply"
o3d.io.write_triangle_mesh(out_mesh, mesh)
print("Mesh saved to:", out_mesh)